|
215 Bryan Street Athens, Georgia 30601 Phone: 706 354-0988 Toll Free: 800 298-0988 Fax: 706 354-8877 Email: macjava@aol.com Hours: M-F 2:30 - 6:30 EST |

|
Carburetor Adjustment Procedure
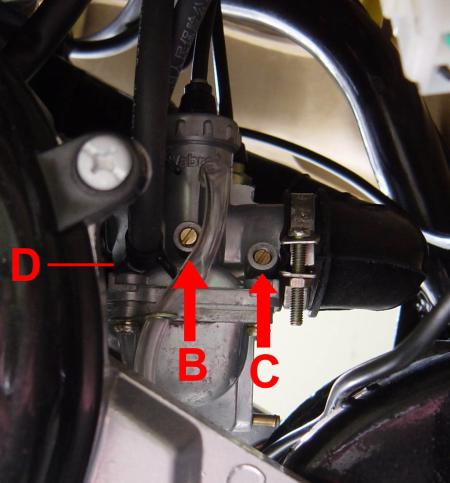
2 Stroke Carburetor AdjustmentPart 1, The Idle MixtureIt is no surprise that the Idle Mixture on a brand new Geely Scooter may need to be adjusted when you receive it. The carburetor is adjusted at the factory where the atmospheric conditions could be quite different than they are in your area. Fortunately, it isn't a difficult process for anyone with a small degree of Mechanical Aptitude. An Inductive Lead Tachometer would be a nice tool to have on hand for this, but all you really need is a screwdriver and a good set of ears. Begin by familiarizing yourself with the scooter carburetor by looking at it. It's located under the right rear fender in front of the rear wheel, attached to the engine. On the side of the carburetor, you will find two brass screws. The screw located farthest from the engine (on the left as you look at it) is the Air/Fuel Mixture screw. Turning this screw Clockwise RICHENS the mixture with more fuel/less air, turning it Counter Clockwise LEANS the mixture with less fuel/more air. The screw closer to the engine at the base of the "tower" is the Idle Speed Screw. Turning this screw Clockwise INCREASES the Idle Speed, turning it Counter Clockwise DECREASES the Idle Speed. Memorize their positions, but don't do anything to them yet. Just identify them so you'll know what to do later
The next step is to warm up the scooter by riding it around for about ten minutes. When the engine is warmed up, park it on the centerstand in a well ventilated area, and leave the engine running at idle. With a screwdriver, give the MIXTURE SCREW a quarter turn in whichever direction INCREASES the engine idle speed. IF turning the screw in either direction causes the Idle Speed to DECREASE, that's it! Set the screw back to it's original position, and you're done already. Move on to the IDLE SPEED adjustment. IF turning the mixture screw in one direction or the other causes the idle speed to INCREASE, continue turning the screw in that direction another QUARTER TURN , and listen carefully to the engine speed for a few seconds. Continue doing this a quarter turn at a time until you hear the engine idle speed begin to DECREASE, and return the screw setting to where the engine runs at the fastest idle. As a final touch, give the screw 1/8th turn clockwise no matter which direction you've been turning it (to err on the rich side which runs cooler). Now, you're ready to set the IDLE SPEED.
Turn the IDLE SPEED screw Counter Clockwise until the engine sounds like it wants to stall, then Clockwise again about 1/8th to a quarter turn to smooth it out. The Geely 2 Stroke seems happy to idle at about 1800 to 2000 rpm, To summarize the process:
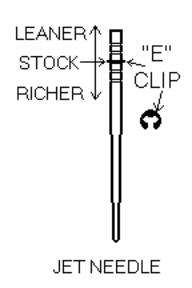
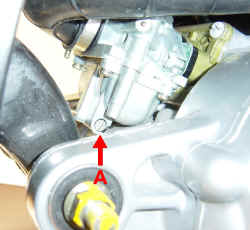
Part II, The Jet NeedleOK, so you've adjusted the Idle Mixture on your 2 stroke Geely as described in Part I, and it runs a lot smoother when you first start taking off down the road. The only problem is that now you've noticed that when you get to about 34 throttle or so, the scooter seems to lag, and maybe even seems to run slower as you open it up to Wide Open Throttle (WOT). You might suspect that the Fuel Mixture still has something to do with it, and you might be right, but don't go back to tweaking on the mixture screw. As stated in Part I, the mixture screw only affects the fuel mixture from idle to about 14 throttle. Beyond that, it has very little effect on the way your Geely runs in the Midrange. Fortunately, this is not a particularly difficult adjustment to make either, and the only tool you willneed is a pair of Needle Nose pliers. First, crawl back under the right rear fender, and take another look at the carburetor. You already know about the Idle adjustment screws, now take a close look at the "Tower" above the Idle Speed Screw (the one on the left). You can see where the throttle cable goes into the top of the tower, and the top looks like it can unscrew like a bottle cap, doesn't it? Well, that's because it does! Don't go playing with it yet. Start the scooter, and take it for a ride. When the engine is all warmed up, come to a stop at a place where you can make a long, straight, level run, and slowly begin to accelerate. Gradually, open the throttle to the point where the engine feels like it's beginning to lag. Hold the throttle steady at that position, and gradually push open the choke lever. The scooter usually will do one of two things. It will either begin to run a little better, or a little worse. In fact, it might even die altogether if you hold the choke too far open for too long. If it does, start it up, ride it around a bit, and try the test again. Do it several times. Be certain that the scooter responds the same way every time you give the choke lever a "nudge". Once you're sure of that, putt back home, shut the engine off, and get ready to do a little work on your machine. With the scooter on the centerstand, reach up under the right rear fender and unscrew the top of the Carburetor "Tower". When it's loosened, lift it straight up to pull out the SLIDE and the JET NEEDLE. Be gentle, don't yank on it! The cable should be long enough for you to pull the SLIDE / JET NEEDLE assembly out where you can get a good look at it. Under the CAP, you should see a spring squeezed into the cylinder shaped SLIDE, with the JET NEEDLE sticking out the bottom. First, let's take a good look at the SLIDE. Notice how the bottom has an ANGLE cut halfway across it. This ANGLE faces the INTAKE side in the Carburetor. It helps the air mix with the fuel while the SLIDE acts like a throttle valve. There is also a NOTCH near the bottom and on one side of the slide. This NOTCH is where the IDLE SPEED screw (not the mixture screw) fits, and does its job of holding the slide up just a little so the scooter can idle. On the other side of the SLIDE, there is a GROOVE that runs the entire length of it. The GROOVE has two purposes. First, it allows the throttle cable to be removed from the slide, and second, inside the "Tower" there is a pin that runs in the GROOVE as the SLIDE runs up and down inside it. That keeps the SLIDE from twisting and turning as it does it's job. It's VERY IMPORTANT to remember all this for when you're ready to put it all back together! Removing the SLIDE from the cable is easier if you hold the SLIDE ASSEMBLY in your left hand while you twist the throttle grip with your right hand. The SLIDE will compress the spring. Hold it together with your fingers as you twist the throttle grip back, and the end of the cable should poke out the bottom of the SLIDE. Lift the end of the cable up out of the groove, and let the spring push the slide off the cable. Hold onto it! You don't want it shooting off to God knows where. Now, you should be holding the SLIDE / JET NEEDLE assembly in your hand. Look inside the slide, and you will see a hairpin type spring holding the JET NEEDLE in the bottom of the slide. Reach in there with your NEEDLE NOSE PLIERS to squeeze it gently and pull it out. Be careful, these things love to jump and hide too. Once the JET NEEDLE retaining spring has been removed, you can push the JET NEEDLE out of the SLIDE. Take a good look at the JET NEEDLE. You can see it looks pretty much like,well, a needle. Tapered to a point on one end, and the "head" has five little grooves with the world's tiniest "E" clip in the middle one. This is the "standard" position for the "E" clip, and you adjust the midrange mixture by moving the "E" clip into a different position. Hold the JET NEEDLE in front of you point down, and imagine how it moves up and down inside the carburetor with the SLIDE. The pointed end fits into a hole in the carburetor called the NEEDLE JET. Since the NEEDLE JET remains stationary, the taper of the JET NEEDLE allows more or less fuel to mix with the incoming air depending on the thickness of the taper that remains in the NEEDLE JET. Moving the JET NEEDLE up lets MORE fuel into the airstream. Moving it down lets LESS fuel into the mix. You change the midrange air / fuel ratio by making the JET NEEDLE move higher or lower in relation to the SLIDE. All you need to know is which way to move it. Remember your test ride when you turned on the choke lever? That temporarily added more fuel to the mix. If your scooter ran BETTER, then the midrange mix is lean, and you need to move the "E" clip one notch down toward the pointed end. If your scooter ran WORSE, then the midrange mix is rich, and you need to move the "E" clip up one notch toward the "head" end. Decide now which groove you're going to put it in, but don't move it more than one notch at a time or you might adjust it too much. The easiest way to remove the "E" clip is to lay the JET NEEDLE on a hard, flat surface with the opening of the "E" clip down. Cover it with your hand or a cloth in case the little clip decides to make a leap for freedom, and press the JET NEEDLE partly out the opening. If the clip doesn't pop off, grab it tightly with your needle nose pliers and carefully pull it off the rest of the way, (if you do lose it, you can get another at most Hardware stores). Using the same hard, flat surface method, press the "E" clip back onto the NEEDLE JET in it's new position, making certain that it's completely snapped into place in it's new groove. Drop the JET NEEDLE back into the SLIDE, and replace the hairpin type JET NEEDLE retaining spring with your pliers, pushing it all the way to the bottom of the SLIDE. Make sure the JET NEEDLE stays in place when you're done. Now comes the hardest part. You have to put the SLIDE SPRING onto the throttle cable where it sticks out under the Tower Cap, and squeeze it past the little ball on the end of the cable as far as you can. Don't get frustrated, I swear it can be done with some practice. Fit the little ball end into its special place in the bottom of the slide groove, and pull the cable into the groove as you push the spring up and over the top of the slide and let it pop into place. Gently, put the SLIDE / JET NEEDLE assembly back into the "Tower" of the carburetor. DO NOT FORCE IT! It will practically fall inside when you have it lined up right. Remember to keep it properly oriented as described before. Jiggle, twist, up / down, play with it until it slips inside the Tower all the way to the bottom, and screw the cap back on. If you have to push the cap down to compress the spring more than a millimeter or two, it isn't right. Pull it out and try again. Once you have the Carburetor back together, take another test ride, (You may want to re adjust the IDLE mixture per Part I of this series). Hopefully, your scooter will accelerate much more smoothly than before. If not, then go back to the beginning and try the "Choke" test again to determine if the "E" clip needs to be moved yet another groove up or down. When in doubt, leave it in the center JET NEEDLE groove as that's the standard position set by the factory, and be happy you saved yourself the $40 a bike shop would have charged you to do the same thing! Fuel LeaksIt's important that you don't operate your scooter if it leaks fuel or oil. Have a professional work on it if you are not familiar with small engine repair. These tech tips assume you have some mechanical ability. Checking for fuel leaks are simple. Just find the wet area and fix the problem. (1.) Make sure the lines are connected to the carburetor. See the picture below with the letter "D"; this is the fuel line connection to the carburetor. (2.) Check all of the lines from the fuel tank to the carburetor and make sure they are tight. (3.) A common problem is fuel leaking from the clear over flow line. This is caused by one of two things. (a.) the choke is stuck, replace the carburetor with a new unit. (b.) The screw at the bottom of the bowl is not tight. Se the picture below and tighten the screw marked "A".
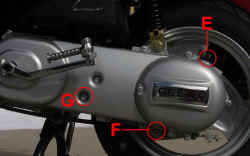
Transfer Case Oil SystemThe transfer case only needs 300ml of 10W-30 motor oil. In warmer climates, 10W-40 would be fine. The clutch shares the space with the chain oil system, so if you over fill the oil you will destroy the clutch and void your warranty. The filler hole is marked "E" in the picture below. The drain plug is marked "F". The screw marked "G" is the safety filler screw. Remove this screw while re-filling the oil and you will be sure not to trash your clutch. The oil will simply drain out of this hole before getting too high and touching the clutch
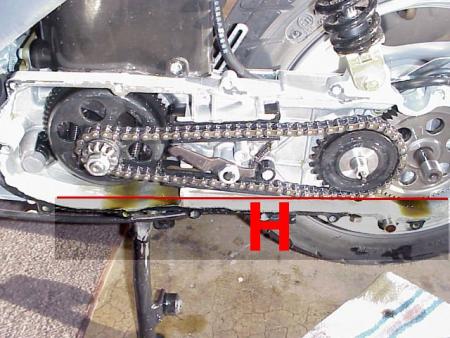
The picture below shows the clutch and driveline. You can see that the clutch could get too much oil if you over fill it, so please follow the manufacturers instructions and only use 100ml of oil. The oil should never go over the line marked "H" in the picture below.
Terms of UsePlease read your owners manual and our disclaimer before operation! |
|